Projects

from tablecloth to crib skirt

What what? 

A tablecloth turned into a crib skirt you say?  No.  Impossible!  It’s too crazy!

Or is it

Couldn’t it be that a tablecloth is just a big piece of fabric waiting to be concocted into something fabulous?

And if you’re like me and you can’t stand the thought of paying $50, $100, or more for a crib bedding set…you learn to cut corners.  Or…”take inspiration where you find it.”  (Booyah!  Remember when I said I was going to start saying that?!?!). 

To be honest, this project was primarily fueled by the fact that the one and only bedding set I fell in love with was $500.    That’s right. 

Five.

Hundred.

Dollareenies.  (The Jerk anyone?  Anyone?) 

Apparently I have impeccable taste:

It was the bedding set that all other sets would thereby be judged against.  And never come close to.   

So knowing I wouldn’t be able to sleep at night after paying five. hundred. dollars for a bedding set, I kinda put the search on hold for a while and turned my attention elsewhere. 

Then I ran across these guys at Target which served as my color inspiration.  Remember?

Well not too long after that, I got a text from my sister asking if I’d seen the matching tablecloth/napkins in that set:

Why no, no I hadn’t.   I immediately secured 1 tablecloth and 1 (set of 4) napkins. 

Some of you may recognize the napkins from this project.

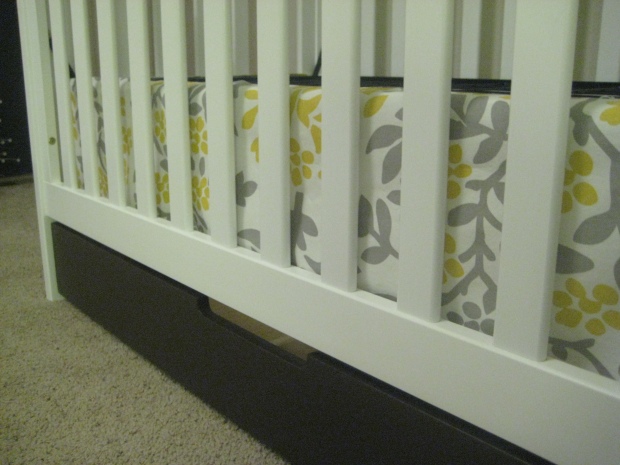
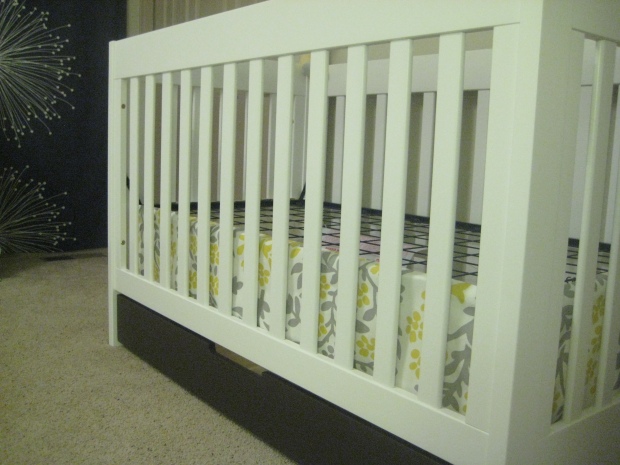
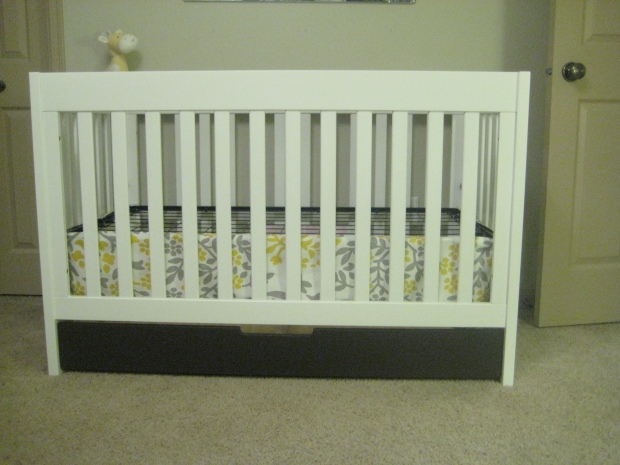
And the tablecloth?   Well, it’s now our totally-functional-and-adorable-yet-affordable crib skirt.  Here’s how it all went down.

First:  buy your husbands favorite beer and ask him to pretty please help you put the crib together. 

Second:    paint the crib drawer because the current “amber” color doesn’t match the espresso wood you have elsewhere in the room.

Third:  smack yourself for being so Type A.

Fourth:  measure the width/height of the desired skirt and add 2 inches for a seam allowance.  For example, I wanted the front panel of my skirt to be 10″x49″ when all was said and done.  So I cut my fabric piece to 12″x51″. 

Fifth:  Repeat for each side section.

Sixth:  Iron a 1/2 hem on all sides of each skirt piece.

Seventh:  Sew your recently ironed hems. 

Eighth:  Sew each panel together so you have one loooooooong crib skirt.

Ninth:  Iron on small velcro pieces every 4-5 inches.

Tenth:  Secure to the mattress frame using the velcro pieces. 


Lastly:  sit back and admire your handy-work that saved you four hundred and eighty dollareenies. 

Not too shabby for $20, eh? 

Hmm.  Do my pictures look super grainy to you??   I’m not too pleased with them myself…I think my ‘ol point-and-shoot is finally rebelling against me and my blogging.   It obviously isn’t because I take bad pictures.

So what do you think?  (no, I’m not asking if you think I take bad pictures!)

Can you understand why I fell for that $500 bedding in the first place?  It’s to die for, right?!  But my conscience and my wallet are thanking me for cutting corners and settling for something that will work just as well.  Not only did it save me a bundle, I actually really really like it!

Now let this be a lesson to ya’ll…napkin, tablecloth or curtain…things aren’t always what they seem! 

Oilo Modern Berries Crib Set pic found here.  Sigh.

Painted Dresser

Happy Halloween!

I should probably be posting something Halloweenie today…but I just couldn’t wait to share the nursery dresser with all of you!  So that’s what you get.  Hope all of you have a spooktacular Halloween!

****************************

When I started thinking about the nursery, I knew we’d need some sort of dresser and I was determined to find an older one that I could give a little TLC.    Not only to save some money, but because I’m weird and like doing that sort of thing.  So I literally started scouring Craigslist when I was about 10 weeks pregnant.   It took a lot longer than I thought to find something that I liked, or one that the seller wasn’t being completely insane about their asking price. 

I finally found a dresser that was solid wood, good construction and in need of a little lovin’.  The price was a bit more than I wanted to spend on something I was going to have to put work into…but I ended up liking it so much that the $100 seemed worth it.  Especially given how long it took me to find this one!  If I remember correctly (which it’s quite possible I don’t…pregnancy brain is REAL) I was about 18 or 20 weeks along when I finally found it.  

IMG_3864

It’s not often you find furniture these days with any character.  I love the curved legs and detail on the top two drawers.   It was perfect. 

Not to mention that it’s solid wood (another rarity it seems) and had good construction.  Like dove-tailed joints:

IMG_3866

IMG_3863

My plan is to use this dresser as the changing table for the first few years.   I personally don’t see any reason to buy a “changing table” when you can simply put a changing pad on top of a dresser and then remove it when you’re done.   Right?  Right!

The process I used for refinishing this piece was pretty straightforward; I relied on one of Kate’s tutorials over at Centsational Girl.  This girl can work some magic with a paintbrush!  Check out her Project Gallery if you have some time!  You’re sure to be inspired. 

Based on Kate’s suggestions, here was my arsenal:

IMG_3868

I started with about 20 minutes of light sanding.  Since I planned on painting (and not staining) sanding isn’t of upmost importance.  But it’s still good to give it a once-over and clean up any dings or remove varnishes.

 IMG_3869

Next comes the wood filler.  This stuff is great for filling in any significant scratches, blemishes or old hardware holes.

IMG_3871

IMG_3874

Next up?  Primer.  Easy schmeasy.   I’m going to be honest, I kinda forgot to take many pictures at this point.    Please refer to pregnancy brain comment above.   So if you’re looking for a full tutorial, I highly recommend Kate’s link I included above.  She’s the real expert here anyways.

After one coat of primer, four coats of paint (yes, you read that right.  FOUR coats), and two coats of  semi-gloss top coat we were in business.   I just had to wait for the current furniture to sell so I could move it up to the nursery – which as you know happened last weekend. 

That was my queue to put the finishing touches on the dresser:  drawer liners and new hardware.

Here she is in her happy new home!

IMG_4023

IMG_4019

IMG_4020

IMG_4026

IMG_4024

The drawer-liners are simply a roll of gift wrap (found a Michaels) cut to fit and then secured with double-sided tape.    I found the yellow knobs at Anthropology (I couldn’t stomach buying enough for the whole dresser at $8 a pop!) so the silver pulls are from Home Depot. 

I love the crisp white and how it really shows off the character of the dresser.    Once we bring in the white crib I think the room will really start to look a bit more cohesive.  And of course once I start adding more pops of that yellow (er, saffron) color around it will make those knobs seem a little more intentional.

I’m sure some of you are wondering about cost.  I mean, the goal of DIY-ing something on your own is typically to save some mula, right?   Well, to be honest, I’ve been a little scared to add it all up.    Since I didn’t have any of the supplies onhand I had to buy everything (like paint, primer, floetrol, etc.).  And then there’s the hardware, etc. 

My best guess is that I came in right under $200.  Which I suppose isn’t bad considering that (1) that’s still cheaper than some of the already-finished dressers I was originally looking at, (2) it’s a one of a kind piece, (3)  it’s solid wood unlike most of the veneer-finished dressers today and (4) it was made with love.  Can you really go wrong there?

I didn’t think so. 

I’m just thankful I did all of this work before showing too much because I’m not sure I could maneuver around as well these days!   Oh, and don’t worry pops – I was wearing a mask the whole time and bought the no-VOC paint.  Safety first.

So there you have it.  Again, I apologize for the lack of photos during painting….but that’s pretty self-explanatory anyways.  

There’s still lots to accomplish on the nursery to-do list but it’s nice to see progress being made.  I actually took on the Pinterest Challenge this weekend and made a mobile…so stay tuned for that reveal on Wednesday!

Oh, and aren’t ya’ll proud of me for not painting it black?!

Nursery Update

I’ve slowly but surely been making progress in the nursery, so I thought I’d take some time to show you what’s new!

Here’s a reminder of what the guest room looked like before:

IMG_3848

IMG_3839crop

IMG_3840

I have been trying to sell the white wicker furniture on Craigslist for quite awhile – maybe a month and a half.  Finally this past week someone purchased it for their own guest room.  I was so happy to see it go to someone who appreciated it and was going to use the whole set.   I admit it was slightly bittersweet because I’d had that set since I was in High school.   But as soon as I remember why it’s leaving I can usually move past the sentimental part of it.  

They just picked up the furniture this weekend and it feels so good to be working with a blank slate.    I didn’t waste any time getting started…

Remember this fabric I bought at IKEA?

IMG_3914

It’s now the curtains in our nursery.  Instead of hemming each panel I simply used Heat ‘n Bond hem tape (discovered over at Young House Love, here).  I found it so easy to use and it saved me having to sew each panel. 

The double-set of windows already had a curtain rod in place, so I just needed to purchase some curtain rings to clip the panels to.    I had decided against making a rod pocket in the panels because (1) it would be easier just to clip the finished panels and (2) it seemed safer.  You know, in case a toddler pulls on them one day!  I’d rather have the curtain panel fall down than the entire curtain rod.   Look at me, already thinking like a parent.

The two smaller windows just needed a small rod installed and I split a pack of curtain rings between the two of them. 

Oh, I guess I haven’t mentioned that I had also purchased new bedding at IKEA.  We’ve decided to leave the bed in the room for now, so it needed an update from the purple duvet cover. 

Here’s what she looks like after the bedding swap, curtain install and furniture removal:

IMG_4013

IMG_4016

IMG_4014

I’ll be removing everything on the wall next since I imagine the crib will go where the old dresser was (right below the current floating shelf).  I’m just guessing that we won’t want a floating shelf above the crib….ha ha.   So that will come down and I’ll probably try to make some sort of mobile or picture gallery on the wall. 

You may notice that the curtains look slightly different on the smaller windows.  That’s because I was able to split one fabric panel between the two windows.  I simply cut it down the middle so I could use it for both.   That also means I have 2.5 extra feet of this fabric, but I figure it will come in handy somewhere down the line.  And I like of like how the panels are a little abstract now. 

Here’s a shot of the curtains closed, just to see what I mean about splitting it in half:

IMG_4015

I’m feeling good about the progress.  There’s still a lot to do but it feels good to have the old furniture gone and ready to move onto the next phase. 

Here’s some of the projects still on my to-do list:

  • Order crib
  • Sew crib skirt (I’ve already picked out the fabric)
  • Move in the dresser (Surprise!  I’ve already purchased and refinished the dresser.  Just need to move it up!  Stay tuned for that reveal).
  • Hang pictures on the wall (I also purchased a bunch of white frames at IKEA for a gallery wall).
  • Make a mobile
  • Keep an eye out for a rug (just a nice-t0-have)
  • Think about purchasing a glider (I’m still undecided on this one)
  • Add throw pillows to the bed and sew covers to incorporate some of the saffron and blue tones here.
  • Sew a baby blanket (again, fabric already purchased, just need to make it!)
  • Organize the closet and dresser

That should keep me busy for the next three months, right?  Luckily I have ideas for most of the bullet points so it’s just a matter of finding the time to actually work on it all. 

I’m looking forward to pulling it all together and especially bringing in some of the yellow and blue tones I talked about here.  I think right now I’ve got a good grey/white base going on, so it’s just a matter of adding in some pops of color!

What do you think so far?  I know it’s not looking very “babyish” but I’m guessing the crib will help with that.   And I guess my whole vision isn’t very babyish with the decor anyway…but that’s ok.  Our baby is going to be very hip.  Ha.

A bit of progress…

So I just realized two things:  (1) I never did a post about moving our new couch in and (2) I still owe ya’ll a tutorial on making some fabulous window flower boxes.  I do apologize, especially to those of you who assumed we were still sitting on camp chairs in our living room.  Quite the contrary.   So how about I start there?  At least for today. 

I’ve mentioned a few times that I sold our living room furniture one day (pretty much out of the blue) on Craigslist.  Whoopsie daisy.  Sorry Hubs.  You can read all about it (like WHY) here.   Which meant that for longer than I’d like to admit, we were sitting on camp chairs in our living room while I researched new furniture.    The problem is that our selection here in Missoula leaves a bit to be desired…and shipping costs on items like couches are pretty much insane.   So I began to realize I was going to have to make some sacrifices if we were ever going to be comfortable while watching TV again. 

Then, during my monthly trip to Costco, I was pleasantly surprised to find out I was there during their once-a-year furniture event.  Word.  up.   And there just happened to be a sectional there that was just about the perfect dimensions for our odd little small space.  I wasn’t overly crazy about the color, but at least it was neutral.  After living for five years with forest green couches I decided I could be picky about color….but neutral is neutral….whether it be the charcoal grey I really wanted, or perhaps a cream, beige or tan.  Another bonus turned out to be that this couch was much cheaper than all of the sectionals I’d been looking at.  I think I could live with beige if it saved me $500!  So I took a picture with my cell phone and headed home to double-check measurements…and it seemed perfect.

I don’t know if you are like this…but when I get something in my head I pretty much don’t stop thinking about it until I make it happen.  Whether it be ice cream, clothes, decor and apparently furniture.  In my defense though, you all know how it works at Costco, right?  They get a set amount of items for their “events” and once they’re gone, they’re gone.  And they had 3 of these sectionals left when I had gotten there.   So now I just had to convince The Hubs to drive out there with his trailer and pick the thing up. 

Once we got it, I have to admit it sat in our garage (in boxes) for a good two weeks while I cleaned the carpets and looked into new cabling.   I ended up doing the carpets on my own but we’re still waiting on cabling…so at 9:00 one night I’d had enough and called my cousin to come help move the sucker in.  Sorry cous’, you know my hormones are raging. 

When they first moved the couch in I had a minor panic attack because it seemed to big.  I mean, I was trying to gain some space here not lose it.   But after living with it for about a month now I think it’s fine.  The bottom line is that it’s just a small room.  And I do think the layout works a lot better now. 

Ok, so some before and afters.  I have to apologize because I sold all of our furniture in such short order that I never really took decent before pics (at least ones with blogging in mind).  These are the pics I used to sell the couches on Craigslist, but you’ll get the idea.   

P.S. I don’t miss this at all!!!

And now here’s with the new furniture finally moved in:

Yes that’s The Big Bang Theory on TV.  Love that show.

Now, before ya’ll get all up in my bizznizz…yes I know the mirror isn’t centered over the couch and I know I need some color in there.  But I’m taking my time trying to figure it out because….well…because you know me and making decisions on colors.  Any suggestions?   Remember this room is far from finished…there’s so much more I want to do.  Like swap out the mirror for 3 fabric canvases (yes, with some color), swap out the curtains with something more fun and patterned, add some fun throw pillows….you know.  All of that stuff and more.  For now I’m just happy that I’ve got a neutral slate to work with and something other than a camp chair to sit in.  

Oh!  And I almost forgot to mention my favorite part.  See those windows behind the couch?  For the past five years they’ve been blocked by a giant TV (see said TV above).  Meaning, we’ve never reaped the benefit of having lots of sun in this room, and before this I’d never even been able to open the windows.  So this might be my absolute favorite part of the new layout:

I can open the windows, and it just so happens that my window boxes are right outside.  I love it.  I love the sun, the breeze and being able to see a pop of color out there.  I”m thinking next year I might have to plant something super fragrant in them.   Which reminds me…I still owe you that tutorial.  I’ll get to it, I promise.

Before I leave you though, let’s check in on my “to do list” for this room and see where I’m at.  Just to keep it real ya know. 

  • Look into cabling for cat5 and coax   Met with cabler.  Just waiting for scheduling!
  • Research and purchase a couch
  • Move couch inside!
  • Rearrange furniture and see what still works and what doesn’t.  There’s not much room for much else as far as furniture goes.  My Crate & Barrel leaning bookcase might need to get moved because I want to put a console table where it currently resides. 
  • Find or DIY some fun patterned pillows for the new couch
  • See if previously-purchased West Elm curtains will work, if not sell on Craigslist.  These will most definitely not work.
  • Sew curtains (if West Elms don’t work)
  • Sew curtain for front door windows to reduce glare on TV.  Update:  my sister suggested I do another no-sew Roman shade.  Perfect!  Now to find the perfect fabric…
  • Consider painting living room.   Considered it….and not going to happen right now!
  • Be on the lookout for a console table for the entryway.  Still looking….
  • Be on the lookout for cheap frames to put a frame gallery in the entry way
  • Paint mirror
  • Replace boob lamp with a some sort of drum shade light (Eden light at CB2?) and install dimmer
  • Find a fun patterned rug (8×10)
  • Update the leather tray for table (line with fabric?)
  • Decide on wall art (maybe some covered fabric canvases) for the wall with the couch. Something to fill up the big space and bring in some color.

Holy cow.  I’m stoked I did that because I’ve come a lot further than I thought!  Yay for me.   Maybe it won’t take me 17 years to get everything done (like I previously thought).   But notice most of the tasks left have something to do with choosing color….hahaha.  Surprised?  I’m certainly not.   So maybe it will take the full 17….

Living room makeover

Thank you everyone for your kind words and well-wishes in my last posts’ comments and on Facebook!  We are super excited about the impending arrival of our little one.   I’m also excited to plan and prepare for him/her, which ya’ll will be privy to I’m sure.  However, I did promise my friend Adam that this wouldn’t turn into a baby blog and I intend to keep that promise.  Most of the time.  Speaking of… 

I consider myself a fairly patient person.  But I am done, I repeat, DONE with our living room.    Not that there’s anything particularly wrong with it (a fact that The Hubs is much too quick to point out).   We have decent furniture (er, ok, “had”), things matched, and as a room it worked.  The room looked nice and even kind-of put together.  The problem is that I had always been “just dealing” with it.  So you have hand-me-down forest green couches that you can’t afford to replace?  Let’s buy some pillows, fancy it up and make it work (any idea how hard it is to coordinate with forest green?!).  Oh?  And the room is pretty dang small?  Well that’s ok, we’ll keep it minimal and pick out some smaller items to go with it.  Like a GIANT 52″ flat screen TV.  Side-eye to The Hubs.  

Perhaps it’s the pregnancy hormones kicking in, or perhaps it’s the fear that I’ll never be able to spend money on myself again come January…but I decided that I must tackle this project.  Now. 

I went ahead and put together a quick and dirty mock-up to portray our current situation.  I only included the major pieces of the room so it looks a little baron (I promise you it’s a bit more inviting than this floor plan leads you to believe).  The door to the bottom left is the front door to our house.  If you proceed through the room (to the left of the couch) you walk past the stairway (leading upstairs) and into the kitchen.   

Allow me to break down my annoyances for you:

1.  Turns out forest green couches just aren’t my thing!  It’s so hard to coordinate colors and accessories.  I always felt extremely limited when picking out pillows, rugs and decor for the room…often passing on items I loved because they just didn’t fit.  

2.  The couches are actually the “overstuffed” kind…which in my opinion is just too big for the size of the room we are working with.

3.  The whole style overall just isn’t me.  

4.  Lack of seating.  I think we could make better use of the limited space we have so more than a few people can sit down at once.   A 52″ HD TV typically means there’s a lot of hockey, football and (sigh) hunting-show watching done at our house and in reality about 5 people could sit comfortably in the room.  And five is generous because it includes me sitting on a trunk that sits in the entryway (not pictured above).

5.  It’s really hard to get to the closet (see it there in the back right hand corner) to get the vacuum out.  Maybe that’s why The Hubs never does it…

6.  The room feels very boxy to me.  Immediately upon walking in the front door you’re met with the coffee table which makes the room feel closed-off and uninviting. 

7.  I have tried every, and I mean EVERY furniture arrangement you can think of with this space.  And the only combination that works with our current furniture is what you see above.  I distinctly remember The Hubs coming home from hunting one weekend and asking me what I did that day, to which I replied “re-arranged the living room.”  He looked at me a bit like I’d gone crazy, peeked back in the living room and said “um, sweetie?  It looks exactly the same.”   Yes.  Yes it did look exactly the same despite the fact that I had spent my entire day pushing and moving heavy furniture around to every possible location.   

But I think the biggest irk about this room is that it’s just not me.  Sure, Monty Dolack paintings are great, but it’s not really the look I want in my house.   Sorry Monty. 

In addition, I feel I’m working hard (and a lot) and we should have stuff that is ours.  Not just hand-me-downs that we’ve “made work” for the past five years.

So one night while sitting on my beloved forest green couch I got to thinking…what if…

What if we scrapped this whole damn room? 
What if we got a new couch and put it on the opposite wall under the window?  Oh my god I’ve never been able to have those windows open or reap the benefits of glorious sunlight shining in…thanks to the giant TV placed in front of them. 
What if that meant the new couch could be a sectional that could seat multiple people?
What if we moved the TV to the opposite wall?

I was onto something and it wasn’t going away.  It was going to take some convincing, some reasearch and some saving, but in the end my vision was something like this:

I love that the layout addresses so many of my previous concerns:  it completely opens up the space, allows for more seating, offers new options for colors slash accessories and opens a whole new world of opportunities for decorating.  

I did have concerns with this design however.  The sectional had to be just the right dimensions to work in the proposed area, and moving the TV to the other wall meant that there is potential for glare from the window on the screen.  Also, there’s no cable hook-up on that wall so we’d either have to run a new cable, or deal with one stretched down the baseboard to the new TV location (um, no thanks).  

So it’s not like this idea didn’t have risks, but god bless hormones because as of last week our living room looked like this:

Aye Carumba

Sayonara couches and get ready to kick-the-curb coffee table and rug.  

Obviously I’ve pulled the trigger on the move, but it’s going a bit slower than I thought.  We’ve found (and purchased) a couch, but we are working on getting cabling done, carpets cleaned and the rest of the furniture sold before moving anything around.   And since you know I’m a planner, here’s my entire to-do list for the room:

  • Look into cabling for cat5 and coax 
  • Research and purchase a couch
  • Move couch inside!
  • Rearrange furniture and see what still works and what doesn’t 
  • Find or DIY some fun patterned pillows for the new couch
  • See if previously-purchased West Elm curtains will work, if not sell on Craigslist
  • Sew curtains (if West Elms don’t work)
  • Sew curtain for front door windows to reduce glare on TV
  • Consider painting living room
  • Be on the lookout for a console table for the entryway
  • Be on the lookout for cheap frames to put a frame gallery in the entry way
  • Paint mirror
  • Replace boob lamp with a some sort of drum shade light (Eden light at CB2?) and install dimmer
  • Find a fun patterned rug (8×10) 
  • Update the leather tray for table (line with fabric?)
  • Decide on wall art (maybe some covered fabric canvases) for the wall with the couch.  Something to fill up the big space and bring in some color. 

This list may take me 17 years to complete, and I’m not opposed to waiting on a few things so I can find something I love.  I don’t want to rush through the list just to cross something off….since I’m starting from scratch I really want this to be a room that makes me happy and is full of stuff I love.  Plus, aren’t time and budget always a concern (that was for you Hubs).   Luckily I have a whole lot of Janna-time coming up in the next few months while the Hubs is out hunting…so hopefully I can make a bit of progress soon! 

I’ll be keeping you in the loop as things progress, but for now you can imagine us sitting in our camp chairs when we need to veg.  Yes, the camp chairs are inside and let me tell you….we both agree they aren’t as comfortable when you’re not sitting by a campfire.